Here’s another “How To” tutorial! In this post, I will guide you through a step-by-step procedure to setup SDL in CodeBlocks. Code::Blocks is the most widely used IDE for the compilation of C, C++, etc. programming languages. But the default setting of CodeBlocks doesn’t include SDL setting. As most of the projects use media applications, setup of SDL is essential in Code::Blocks IDE.
What is SDL?
Whenever a low level access is to be provided to audio, keyboard, mouse, joystick, and graphics hardware via Dierct3D and openGL, a specially designed cross-platform development library is required. This library is called Simple DirectMedia Layer, and is commonly known as SDL.
SDL has a great significance in developing both large and small projects. It assists in the development of high performance computer games and other media applications which run on many operating systems such as Windows, Linux, IOS, Android, etc.
Following the very simple steps (with screenshots) presented below, you can easily setup SDL in CodeBlocks and GCC MinGW Compiler. Make sure you’ve properly installed CodeBlocks on your system.
Steps to setup SDL in CodeBlocks:
- Download SDL library to your computer. Click here to download SDL.
- The download file is in Zip format. Extract the download file to certain location.
- Now, copy the SDL.dll file that you have downloaded in Computer > C Drive > Program Files > CodeBlocks > MinGW > bin
- Create a New Folder in C drive named SDL. Copy all the include and lib folders into SDL from extracted folder of download file to SDL folder in C drive.
- Open the Code::Blocks IDE.
- Click at Create a New Project in the start window of CodeBlocks as shown below.
- After that, a dialogue box appears with a number of options such as AMR Project, ARV Project, Console Application, D Application etc. Out of them, select SDL project and click Go.
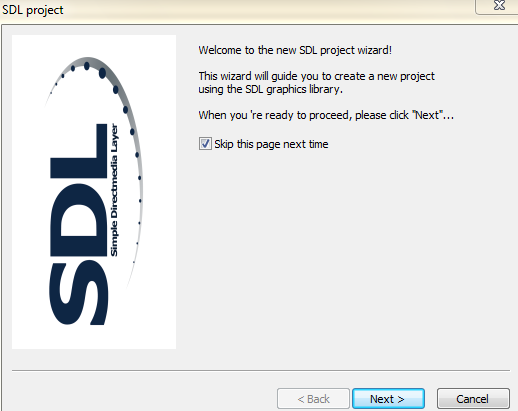
- Again, another dialogue box appears, named SDL project and saying “Welcome to the new SDL Project Wizard”. Click Next at the bottom of the dialogue box.
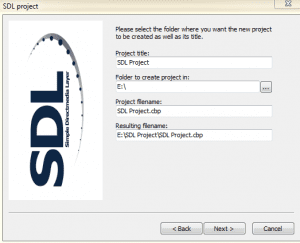
- Give Project Title and location of folder to create project, and then click Next. I have used SDL Project as title and drive E as location as shown in the screenshot below. You can give any name and location.
- Now, give the path of SDL folder created in C Drive; then click Next.
- Click Finish button at the end. Now, you are ready to create a SDL project.
Also see,
How to include graphics.h in CodeBlocks?
How to setup OpenGL (GLUT) in CodeBlocks?
You can use SDL projects – Bike Race Game and Helicopter Game to check whether you correctly setup SDL in CodeBlocks. If you have any queries or suggestions regarding this post, or if you encounter any problems in the setup procedure, mention them in the comments.


I didn’t find any folder inside the zip file.
Why do you need a folder inside the zip file? Just copy the SDL.dll file in the location as mentioned in the tutorial and proceed with other steps.
Thanks.